Around 15 years ago, Adobe introduced Flex 2.0, ActionScript 3.0, and Flash Player 9. I jump started my career as an expert in building Flex components and apps. Eventually, my experiences with Adobe’s framework led to my creation of Feathers UI — which today runs on OpenFL with the Haxe programming language. OpenFL aims to be an implementation of the Flash Player API — but it can target many platforms, from native mobile and desktop to web browsers with JavaScript (no plugins!). Over the years, I’ve also been a contributor to the Apache Royale compiler — which generates JavaScript from ActionScript 3.0 code. You are probably already seeing where this is going…
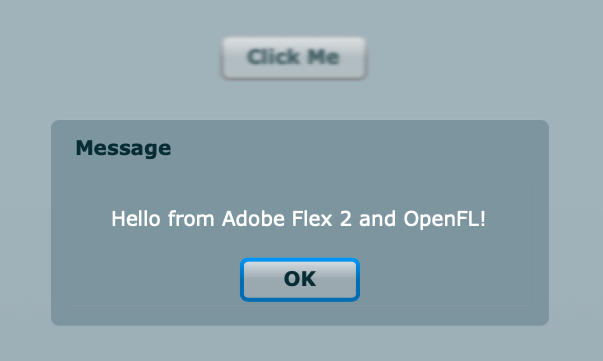
Is there some way to get a Flex application to run on OpenFL instead of Adobe Flash Player? OpenFL can target JavaScript, and Apache Royale can compile ActionScript 3.0 to JavaScript. Can both technologies work together? See for yourself: Demo: Adobe Flex 2 running on OpenFL.
Before you fall too far down the rabbit hole, let me warn you that this is all held together with bandaids, bubble gum, and duct tape.
Yes, it’s using the real ActionScript 3.0 source code included with the Flex 2 SDK, compiled to JavaScript with Apache Royale. It’s not a mockup or another GUI framework made to look like Flex. I had to make a few minor modifications to Flex classes due to slight differences between Flash Player and OpenFL, but most of the code is exactly the same as what Adobe/Macromedia wrote back in the day.
For an example of what I needed to tweak, the parent property of the DisplayObject in OpenFL is not a getter and setter (like it is in Flash Player). It’s a simple variable field instead. So when Flex tries to override the parent property to hide internal implementation details, that doesn’t work very well. I ended up modifying the code to use the internal/private _parent variable in several places to ensure that layouts worked the correct way. A more robust solution would be necessary for a real-world app (maybe a new public uiParent or flexParent property?), but this got things working quickly for my demo. Similarly, I had to tweak Flex’s overrides of some display list APIs, like addChild(), to handle some minor differences where OpenFL needed some extra hints to use only its internal APIs and not overrides. I also had to comment out some ApplicationDomain stuff that really only applies to SWF files loading child SWF files in Flash Player.
If you’re on a high DPI screen on desktop, you may notice that everything is rendering at the proper size, but it’s not blurry! This required adding some new code to Flex to smartly scale the SystemManager root display object. Basically, I just set scaleX/scaleY, and then any calculations in the framework using stage.stageWidth or stage.stageHeight needed to be tweaked to divide the width/height by by its respective scale property. I can’t stand looking at blurry Canvas/WebGL, so I decided to take some extra time to make things look good.
I did only enough work to get the Application, Button, and Alert components working, and that’s it. I’m sure that every Flex component would require at least some superficial tweaks. But I’m also impressed at how much code “just worked” and that I needed to focus on specific areas only. It really shows how well OpenFL emulates the Flash display list and vector drawing.
I had to manually bootstrap some things when the Flex app starts up, similar to the way that the Flex SDK compiler generates code for you automatically (you can see some of this generated code when you use the -keep-generated-actionscript compiler option when using the original Flex SDK compiler). For instance, I had to manually populate Flex’s StyleManager. The Royale compiler compiles CSS to native browser CSS for HTML, so that was never going to work for Flex running on OpenFL in HTML Canvas/WebGL anyway. Flex CSS is a simple subset of browser CSS, so I mainly just did a few Find/Replace commands in my editor to generate ActionScript from parts of defaults.css I copied from the Flex 2 SDK.
MXML only kind of worked. I could create a root component, set some properties, and listen to events, but adding children failed. The Royale compiler actually supports MXML with all of the bells and whistles, but the way that this gets converted to JavaScript isn’t really in the right data format for Flex to understand. With a few tweaks to the Royale compiler, and by adding some some additional parsing code to Flex, it could easily be done, though. For this demo, that wasn’t necessary.
I chose the very old Adobe Flex 2 released in 2006 instead of the newest Apache Flex 4.16 because I figured I would be most likely to find success creating this simple demo with an early version of the framework that hadn’t grown very complex yet. After completing this demo, I still believe that this was the right choice, but I also feel confident that Flex 3 or Flex 4 could also be feasible now that I have experience getting Flex 2 working.
Unfortunately, I’m not sure that I can legally share my code for this demo. Version 2 of Flex was still a commercial product (even if source code was included for customers to read). It was a later version of Flex that Adobe released as an open source project. I don’t think the open source license extends to previous versions. While I doubt Adobe legal cares about a discontinued product that eventually became open source, better safe than sorry. If you really want to see more, you should try to get in touch with me privately.
EDIT: I updated the project to use Adobe Flex 3, which was the first version that Adobe released as an open source project with the Mozilla Public License (MPL). Download the complete source code for this proof-of-concept from Github:
Github repository: openfl-adobe-flex-poc
Anyway, I just wanted to share a bit of nostalgia with you today. Back in the mid 2000s, Adobe Flex was a really great way to build rich applications for the web — an impressive precursor to today’s SPAs/PWAs (single page apps or progressive web apps) built with frameworks like React, Vue, or Angular. I owe much of my early career growth to Flex. Even if I can’t use Flex in my software development anymore, I still try to remember some of its spirit as I work on Feathers UI for OpenFL. That being said, it was ridiculously fun to use the real thing for the first time in a very long time!