Having your development tools rebuild your project automatically when a source file changes can be very convenient. Especially when you’re trying to ensure that everything looks just right, and you’re making a lot of tiny little tweaks, which require a short feedback loop.
Today, I’m releasing the first version a new CLI utility for Haxe developers that I’m calling hunter. This tool runs in Haxe’s interpreter using the haxelib run hunter command, and it simply watches one or more directories for changes. When a change gets detected, it automatically runs any command line tool that you specify. For instance, you might watch your src directory for changes to .hx code, and then compile your project in response.
Here’s an example command that will rebuild a Haxe project when files in the src directory change:
haxelib run hunter "haxe compile.hxml" src
The first argument passed to hunter is the command to run (be sure to wrap it in quotes or escape the spaces if you need to include arguments), and it is followed by a separate argument for each directory to watch for file changes. There are a few optional arguments available too, like --ignoreDotFiles and --interval, which you can learn about in the README.
Or maybe you’re using OpenFL instead. Luckily, any CLI command is supported by hunter:
haxelib run hunter "lime build html5" src
The hunter utility is built using the file system watchers implemented in the excellent haxe-files library.
My reason for building hunter is to help transition Lime and OpenFL away from requiring Node.js for certain functionality, like the -watch option. Ideally, any Haxe developer (not only those using OpenFL and Lime) should be able to use haxelib run for common development tasks like this, without requiring a separate runtime like Node.js, Python, etc. to be installed on a their system. It’s the same reason why I created Snake Server, which provides a simple HTTP server for testing JS and HTML content locally. I’m hoping that the next major version of Lime will be able to switch to these new CLI utilities that run in the Haxe interpreter instead of Node.js. It will result in a smaller Lime bundle to download, and it will enrich the Haxe ecosystem with new tools that everyone can use.
I hope that the Haxe community finds hunter to be useful for rebuilding projects when files change. If you like hunter (or my other utilities, like snake-server), please consider a monthly donation towards my open source contributions on my GitHub Sponsors page or my Liberapay page. Thank you!
In my previous OpenFL and Lime devlogs, I’ve mostly talked about the technical details of implementing new features in OpenFL. Not this time… but don’t worry! There’s more of that coming soon. I have a couple new features currently in development that I’m planning to write about once I get them committed to the Git repository. However, today, I thought that I would share my journey fixing some text issues that popped up recently in Lime 8.2.
If you’re not familiar, OpenFL is an implementation of the APIs available in Adobe Flash Player (and Adobe AIR) using the Haxe programming language. Projects built with Haxe can be cross-compiled to JavaScript, C++, and many other targets — making it available on the web, desktop apps, mobile apps, game consoles, and more. Lime is a dependency of OpenFL, developed by the same team, and it exposes various native C++ libraries to Haxe (such as SDL, FreeType, and various audio and image format decoders).
Some fonts render incorrectly in Lime 8.2.0
Soon after the release of Lime 8.2.0, some users reported that certain fonts weren’t rendering correctly. Many fonts were fine, though, which is how this got missed in testing. The fonts that didn’t render correctly were resulting in lines that were very close together, with almost zero gap in between them.
My initial investigation showed that the broken fonts had different ascent and descent values compared to Lime 8.1.3 (I’ll go into detail about what those terms mean in a little bit).
Interestingly, I also discovered that when compiling with Lime’s flash/air targets, the same fonts (when embedded into the SWF generated by Lime) were getting rendered incorrectly in Flash Player or AIR. Obviously, we couldn’t have replaced Flash’s C++ text rendering code with our own (even accidentally), so that’s pretty strange. When Lime embeds a font for Flash, it manually writes the binary SWF tags that tell Flash how to render each of the font’s characters, and how lines should be laid out relative to each other. That code in Lime that writes binary SWF tags shares something in common with OpenFL’s text rendering code: Both use the open source FreeType library to parse and read the font files.
We had updated FreeType to version 2.10.0 in Lime 8.2.0. Simply put: the new FreeType was the obvious culprit for this bug. Rolling back to an older version of FreeType fixed the issue, and that’s what we did in Lime 8.2.1. That resulted in a different letter spacing issue, though, and it could have been fixed by downgrading FreeType even further. I didn’t want to do that.
It would be nice to be able to update FreeType from time to time to get the latest bug fixes and enhancements. I wanted to know why updating FreeType changed the line spacing, and if there was something I could do to restore the behavior from the older FreeType version with that newer FreeType version so that OpenFL text rendering would more closely match Flash Player and AIR, which behaves more like the older FreeType. So my investigation continued, and I fell down quite the rabbit hole on the subject of text rendering.
A bit of terminology about text line metrics
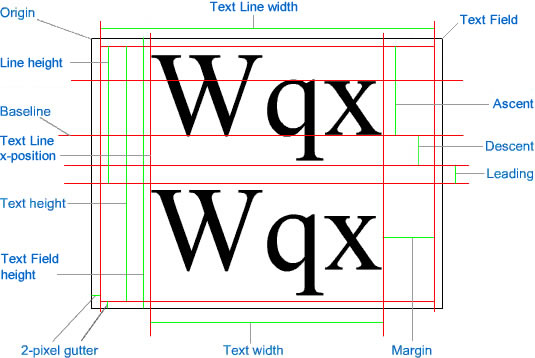
To get everyone on the same page, let’s define some terms used when measuring and laying out text, including the ones that I promised to define earlier. The image below is from the Adobe Flash documentation, and was licensed CC-BY-SA 3.0 by Adobe.
First, let’s talk about the baseline. The baseline is where the bottom of most characters will align when you position them next to each other. In the picture below, the bottom of the W, the bottom of the circular part of the q, and at the bottom of the x are all resting on the baseline (drawn horizontally in red from the far left side of the image to the far right side).
The ascent of a text line is the distance from the baseline to the highest point of the line. In the picture above, the ascent is drawn vertically in green to the right of the x character. It starts at the baseline and goes a bit above the height of the W.
Some characters are partially rendered below the baseline, such as lower case g, y, or j. The descent is the distance from the baseline to the lowest point of the line. In the picture above, the descent is drawn vertically in green a bit below and to the right of the ascent. It starts at the baseline and extends a bit below the q.
Leading or line gap is the spacing between lines. In the picture above, the leading is drawn vertically in green a bit below and to the right of the decent. It starts at the descent of the first line and extends to the top of the ascent of the second line.
Line height is distance from the baseline of one line to the baseline of the next. This is a value that may be customized by the font designer based on aesthetic taste. In the picture above, it is drawn vertically in green on the left of the first line. In OpenFL, and Adobe Flash before it, the line height is typically expected to be equal the sum of the ascent, descent, and leading/gap.
How do font files store text line metrics?
So it might be a little bit weird, but values like ascent and descent may be stored in three (possibly even more, for all I know…) different places in a font file. Even weirder, each of those different places may store a completely different value than the others. What?!
Strange, but true. For ascent, there’s hheaAscender from the hhea OpenType table, typoAscender from the OS/2 OpenType table, and winAscent also from the OS/2 OpenType table. Descent and line gap have similar values in those tables.
So, if there are duplicates with different values, how do you know which one is correct? Well… that’s where things get tricky. Not everyone agrees about which one should be considered correct.WHAT?!
That’s right! Programs like Microsoft Word and Adobe Photoshop don’t necessarily render the same string of text with the same text metrics when using the exact same font file. In other words, Word might select one set of ascent and descent values (such as winAscent and winDescent), while Photoshop selects a different set (such as typoAscender and typoDescender). Even stranger: Word and Photoshop might actually choose the same set of metrics for certain font files.
Basically, Word and Photoshop each have different algorithms for determining which of the metrics from the font file should be selected. These algorithms might depend on whether some of the metrics are missing or not, or if certain flags have been set elsewhere in the font data to indicate that the designer preferred certain metrics over others. Part of why there are multiple sets of metrics is backwards compatibility with older, legacy programs and operating systems that can’t be updated to handle new font format improvements. It’s quite the complex beast!
Customizing FreeType’s algorithm
Upgrading FreeType in Lime 8.2.0 drastically changed the text line metrics passed to OpenFL (and also used by Lime for generating embedded SWF fonts). This is because FreeType changed its algorithm for determining how to choose the correct metrics between the 2.9.1 version and the 2.10.0 version.
As a result, when using FreeType 2.10.0, it’s likely that ascent and descent values will be noticeably smaller than when using FreeType 2.9.1. This isn’t necessarily bad, but OpenFL’s text layout algorithm makes some assumptions about the relationship among line height, line gap, ascent and descent. Those assumptions were safe to make with FreeType 2.9.1’s algorithm, but not with FreeType 2.10.0’s new algorithm. In the future, we might consider upgrading OpenFL’s text rendering code to support both algorithms without issues. However, it’s a non-trivial change, and it may risk introducing new bugs. For the time being, it’s better if we could upgrade FreeType to 2.10.0 or newer, but keep FreeType 2.9.1’s algorithm.
Luckily, FreeType’s algorithm for choosing text line metrics is not set in stone. Developers are welcome to provide their own custom algorithm for choosing metrics, if they desire. With that in mind, it is actually pretty easy to copy the algorithm from FreeType 2.9.1 and use it with FreeType 2.10.0, so that’s exactly what I did in Lime 8.2.2.
For reference, here are links to the original C code used for choosing text line metrics in both versions of FreeType, if you want to see how they’re different.
Each snippet includes a comment that explains why they chose to implement the algorithm the way that they did.
And here’s Lime’s new implementation, based on FreeType 2.9.1 (which also includes fallback to FreeType 2.10.0’s implementation, if any metric is missing, for some reason):
That’s it! Lime 8.2.2 was released at the end of 2024, so if you’re still in Lime 8.2.0 or 8.2.1, you should probably update Lime to get this fix.
If you’re interested into diving deeper into the topic of font files and their various metrics, I highly recommend reading Glyphsapp Tutorial: Vertical Metrics. In addition to the FreeType documentation, the Glyphsapp tutorial was definitely my most referenced resource while trying to understand how this all worked. It has the right amount of detail, and it carefully guides you through a journey of understanding it all, and I was really impressed.
Many programming languages, or their communities of library authors, offer a way to quickly start a web server in a specific local directory with just one simple command. For instance, Python users can run python3 -m http.server 8000, or Node.js users can install the http-server module globally and run http-server -p 8000. For reference, here’s a big list of http static server one-liners for a variety of languages and their run-times.
When working in Haxe, and compiling to JavaScript in HTML pages, I often need to launch an HTML file in a web browser. It’s always best to use a server instead of double-clicking an HTML file in your operating system’s file explorer because web browsers often behave differently with local files versus content originating from web servers. I typically reach for the Node.js command that I mentioned above. Similarly, the command line build tools used by OpenFL also use the same http-server module with Node.js when you run the lime test html5 command to run your project in a browser.
As a Haxe developer, I can’t help but feel like the Haxe community should be able to reach for a pure Haxe solution that starts a local web server, and it shouldn’t rely on another language’s tooling.
Last week, with that idea in mind, I started working on snake-server 🐍, a Haxe library (built on sys.net.Socket from the Haxe standard library) that can be used to start a web server in a specific directory for local development — all with one quick command.
haxelib run snake-server
It uses port 8000 on local IP 127.0.0.1 with protocol HTTP/1.0 by default, in the current working directory. However, there are command line options for customizing all four of those things.
Install snake-server with a one-time command:
haxelib install snake-server
It’s called snake-server because I actually ported Python’s http.server and socketserver modules to Haxe. To be clear, not as externs, but as pure Haxe that works on any sys target, including the Haxe interpreter, HashLink, hxcpp, and Neko. I figured an official Python module would have the most important edge cases covered, and I could see it was created with a similar raw TCP socket API that’s available in Haxe, so it would be easy enough to port that existing code to Haxe and get a solid solution working as quickly as possible.
The server handles each request in a separate thread. I skipped this part at first because it didn’t seem necessary. However, as I finished implementing HTTP/1.1 support, I realized it was vital because keep-alive requests would block on the final socket read, until timeout, which would block other socket writes from completely flushing, which made pages appear to partially load for several seconds, and then finish all at once after the timeout delay. Each request in a separate thread made everything snappy while supporting the keep-alive optimization.
In your terminal, you can exit the server with the standard Ctrl+C keyboard shortcut. Occasionally, if you exit snake-server, and then try to start snake-server again on the same port too quickly, it’ll say that the port is still in use. It should become available within seconds, though. I think other languages may provide a way to ensure this doesn’t happen, but I’m not sure if that’s catching the Ctrl+C interrupt signal, or if it involves tweaking the socket configuration in some way. I don’t think Haxe exposes what I need, but maybe I’m wrong? Let me know if you know how to fix this issue.
The snake-server source code is on GitHub. Bug fix PRs are welcome, especially for things that behave differently than the original Python implementation. However, please create an issue to ask before submitting new feature PRs. I plan to keep the Haxe code as close to the original Python code as I possibly can, to avoid future maintenance headaches if I port important changes from future Python updates.
I hope that the Haxe community finds snake-server to be useful for their everyday web development needs. If you like snake-server, please consider a monthly donation towards my open source contributions on my GitHub Sponsors page or my Liberapay page. Thank you!